Computer Audio and Music Programming
Music 147 / CompSci 190 / In4MatX 190
University of California, Irvine
Spring 2016
This page contains examples and explanations of techniques of computer audio and music programming using the Web Audio API and Max. The examples were written for use by students in the Computer Audio and Music Programming course at UCI, and are made available on the WWW for all interested programmers and instructors. If you use the text or examples provided here, please give due credit to the author, Christopher Dobrian.
[Each hyperlink below is linked either to an HTML page containing JavaScript that accesses the Web Audio API or to a file of JSON code containing a Max patch. The HTML pages work in almost any standard browser. To view the JavaScript code, either "View Source" of the page in your browser, or right-click (control-click in Max OS) on the link to Save it to a file, which you can then read in any text editor. For Max patches, right-click (or control-click in Mac OS) to Save the .maxpat file directly to disk, which you can then open in Max.]
Examples will be added after each class session.
Example 1: The simplest way to play a tone in Web Audio
Play a tone when the page is loaded
This web page does nothing more than play a 440 Hz sine tone when the page is loaded, and stops only when the page is closed. To play audio in Web Audio, in JavaScript you create what's called an "audio context" for the window. Within that audio context, you create one or more "audio nodes" which generate, play, or process digital audio. You connect those nodes together and connect the result to the "destination" output of the audio context, which by default will be connected to the audio output of the computer.
The comments in the source code describe the procedure thoroughly. You create an AudioContext, you use that context to create an OscillatorNode (a type of AudioNode), and you connect the OscillatorNode to the "destination" property (also a type of AudioNode) of the AudioContext. Then you start the OscillatorNode.
Example 2: The simplest way to play a tone in Max
Play a tone when the patch is loaded
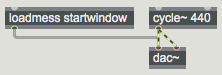
This Max patch emulates the Web Audio program shown in Example 1, demonstrating the simplest way to play a tone in Max. You create a dac~ object to represent the output of the program, analogous to the AudioContext.destination in Web Audio, which normally is connected to the audio output of the computer. You create a cycle~ object, which is comparable to an OscillatorNode in Web Audio, and connect its output to the input of the dac~. The loadmess~ object sends the message 'startwindow' to the dac~ as soon as the patch is loaded, turning on audio processing in the window.
One difference between an OscillatorNode in Web Audio and a cycle~ object in Max is that the default frequency of an OscillatorNode is 440 Hz, whereas the default frequency of a cycle~ is 0 Hz (an inaudible frequency, yielding a constant value). However, it's easy to set the initial frequency of cycle~ to something other than 0 just by typing the desired frequency in as an "argument" after the name of the object, as shown in this patch.
Example 3: Mix two sounds equally in Max
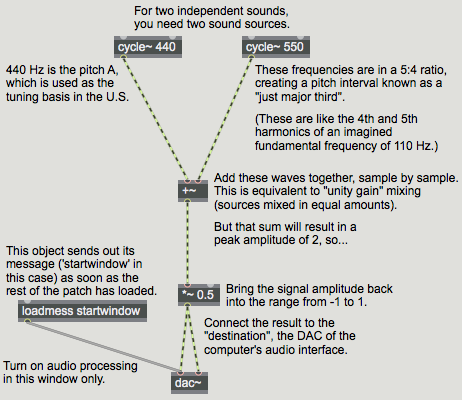
When two sounds occur simultaneously in proximity, their waves interfere in the air, effectively being "mixed" (added) together. So, to emulate that in the digital world, to mix two sounds together, you simply add the two audio signals. Be careful, though, because adding two full-amplitude signals can result in a summed signal that has a peak amplitude that exceeds the expectations of the DAC, causing clipping.
In this example, we use two cycle~ oscillators as the sound sources, and mix the two signals together sample-by-sample with a +~ object. We then multiply the summed signal by 0.5 with *~ in order to reduce the signal amplitude back within range of the DAC (dac~), which expects signal values between -1 and 1.
Example 4: Turn a tone on and off in a Web page
This is very much like Example 1 above, except we've given the user a button to turn the tone on and off. We've also used the OscillatorNode's "frequency" property to set the oscillator's frequency to 1000 Hz instead of the default of 440 Hz. (Technically the frequency property is an AudioParam object, which in turn has a "value" property; that's what you have to set.)
Example 5: Play a sound in a Web page without JavaScript
The HTML <audio> tag is a common way to play a sound in a web page, but doesn't use the Web Audio API at all. This tag creates an Audio element and loads in a sound file, which can be played with its own set of controls. Subsequent examples show how to access an Audio element in JavaScript and how to use it as an audio source in the Web Audio API.
Example 6: Use JavaScript to create and control an Audio element
The HTMLAudioElement interface in JavaScript
In lieu of putting an <audio> tag in your HTML code, you can make an Audio element in JavaScript by creating a new HTMLAudioElement. This is still one step short of integrating it into the Web Audio API (which is shown in Example 7), but it shows how to create the Audio element and access its properties and methods in your JavaScript code.
Example 7: The simplest way to play a sound file in the Web Audio API
Use an HTMLMediaElement as a source AudioNode
The Web Audio API AudioContext has a method to create a source node that uses an HTMLMediaElement (such as an Audio element) to play sound within the audio context. That AudioNode can be connected to any other AudioNode (processor nodes, a gain node, etc.) before being connected to the output destination.
This doesn't really give you any added control over the sound playback itself, but it does allow you to alter the sound in the Web Audio API before outputting it. In this example, we pass it through a Gain node to fade it in and out gradually.
Example 8: Buffer and play a sound in the Web Audio API
Use buffered sound data as the audio source
By loading sound into a RAM buffer, we gain immediate random access to the data, giving optimal control over its use. This process is a little more complicated than just using an Audio element (just playing a sound file), but it's usually preferable because of the versatility it provides. The buffered sound can be treated as a source audio node, similar to an oscillator, and can thus be played, processed, analyzed, drawn, etc.
You use the XMLHttpRequest API to get data from a sound file on the server, place that data in an AudioBuffer, decode it if it's in a compressed format such as MP3, then use that buffer of decoded audio as a BufferSourceNode in the audio context. For simplicity, this example does nothing more than that, then connects the BufferSourceNode to the context destination and starts it.
Example 9: Open a sound file and play it in Max
Example from a previous class.
Example 10: Using presentation mode in Max
Example from a previous class.
Example 11: Trigger sound cues with the mouse or from the computer keyboard in Max
Trigger sound cues with the mouse or from the computer keyboard in Max
Example from a previous class.
Example 12: Getting a sample from RAM in Max
Example from a previous class.
Example 13: Playing a sample from RAM in Max
Example from a previous class.
Example 14: Vibrato in Web Audio API
Vibrato by means of frequency modulation
This web page shows the audio graph of connections that one needs to create in order to apply a vibrato effect to an oscillator tone by modulating its frequency with a second (low-frequency) oscillator.
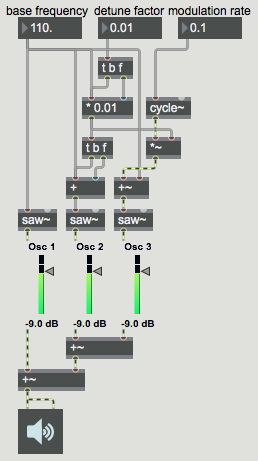
Example 15: Frequency modulation in Max
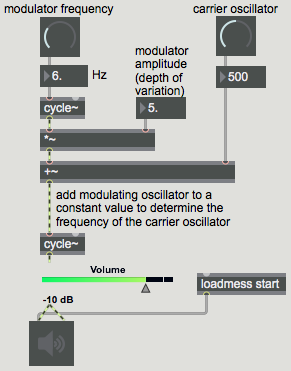
Frequency modulation refers to using the output of a low-frequency oscillator to continually alter (modulate) the frequency of another oscillator. This example provides the user control of the amplitude and frequency of both the "carrier" oscillator (the one we hear directly) and the "modulator" oscillator (the effect of which we hear indirectly). The output of the modulating oscillator is added to a constant (the main frequency), thus causing the carrier frequency to fluctuate up and down around that central frequency.
In this patch, most of the user interface objects (the dials, the gain slider, etc.) have been set, in the Inspector, to send out a particular value as soon as the patch is loaded. The main frequency of the carrier is 500 Hz, and it's amplitude is scaled to -10 dB by the live.gain~ object; the rate of the modulator is 6 Hz and its amplitude is 5. The main carrier frequency of 500 Hz is thus pushed up as high as 505 Hz and dips as low as 495 Hz, with a full cycle of modulation occurring 6 times per second.
Example 16: Did you know?: Initializing the user interface in Max
Initialize user interface objects
In Max, by default, user interface objects will initially be set to 0, or to their minimum value if that has been set to something other than 0. There are many ways you can initialize those objects to some other value, however. Very often you want a user interface object to display some other value when the patch is opened, and you will likely want to send that value to specific places in your program so that it behaves properly.
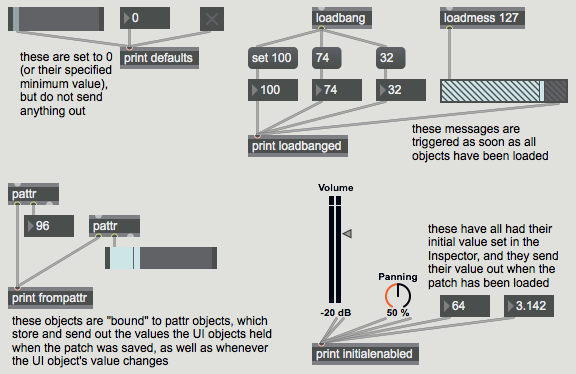
This patch demonstrates a few of the more common ways to initialize user interface objects. Open your Max Console window so that you can see what is printed when the patch is opened.
In the top left corner of the patch you see ordinary objects that have not been altered in any way. Notice that they're all set to 0 by default, and that they don't send anything out when the patch is opened. The print defaults object doesn't receive anything initially.
In the top right corner of the patch you see two useful objects for initializing your patch: loadbang (sends out the message 'bang') and loadmess (sends out whatever message you type in as the argument) both are triggered as soon as the entire patch has been loaded. Important: Notice that if you have more than one such object, it's undefined which will trigger first. If you care about the message order, you should use a single loadbang object and trigger other messages in the desired order. You can control the order by the way you place the message boxes on the screen (taking advantage of Max's right-to-left ordering principle) or using message-ordering objects such as trigger or bangbang.
If you want to set the value of a user interface object without passing that value on out its outlet, use the 'set' message. Notice that the number box that receives the message 'set 100' does not pass its value out its outlet initially.
In the bottom left corner of the patch you see the pattr object in action. The pattr object (stands for "patcher attribute") stores a message, and it can be "bound" to a user interface object such that the two objects share the same value. Connecting the second outlet of pattr to the inlet of a UI object binds them.
The value of a pattr will be automatically saved along with the patch, and will be sent out when the patch is loaded. Notice how, when the patch is loaded, the bound UI objects display the pattr value (and actually send it out, although that's not shown in this patch), and the pattr itself sends out the value. Since these objects share a memory location, and to some extent they govern each other, you have to be a bit careful not to inadvertently send duplicate data. This patch shows a useful configuration. We don't actually use the outlet of the UI objects themselves. Instead, we use the first outlet of the bound pattr, which has the same effect. Whenever we alter the UI object, the value of pattr gets updated and sent out.
The pattr object and several related objects comprise a very complete and useful storage and recall system for managing important values in a patch. If you're interested, you can read a thorough tutorial on the pattr object and its related objects in Examples 57-63 of a past class.
In the bottom right corner of the patch you see UI objects that have been initialized and have sent out their values without the use of any other object. Most UI objects can be set to do that in their Inspector, by checking the "Initial Enable" option and specifying an "Initial" value. Below is an picture of a Max for Live user interface object, live.dial, and some of its Inspector settings.
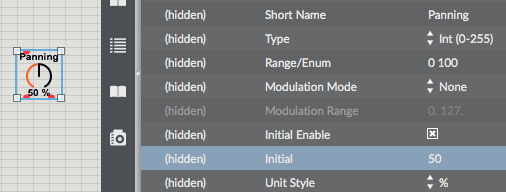
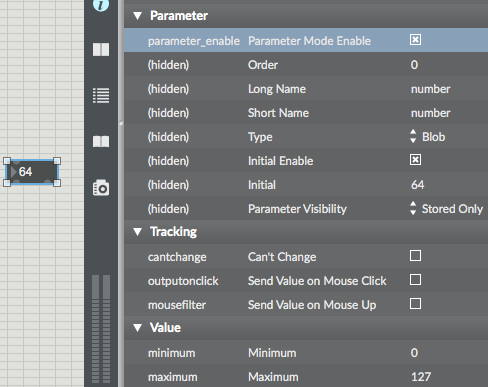
Most of the original Max UI objects (ones that weren't specifically designed for use in Live) can be initialized in the same way. However, for those objects, in order to see the "Initial Enable" and "Initial" options in the Inspector, you first have to check the object's "Parameter Mode Enable" option, as shown below.
Any of the methods shown above -- loadbang, pattr, or the Inspector -- is equally valid as a way of initializing values and initializing the display of user interface objects in your patch. They have slightly different advantages. Using the "Initial" setting in the Inspector is perhaps the cleanest and easiest. Using pattr means that the current value will be saved whenever the patch is saved. Using loadbang means that you have control over the order in which things are initialized. Once again, its important to stress that the order in which objects will be initialized is undefined and unpredictable, unless you use a single loadbang object (in conjunction with trigger or bangbang) to trigger messages in a specific order.
Example 17: Synthesizing classic waveforms
There are certain wave types that are historically used in electronic music, known as "classic" waveforms: sine, sawtooth, square, and triangle. These are the four waveforms generated by the classic Moog synthesizer oscillators, and are still quite useful in computer music.
The sine wave has energy at only one frequency. The sawtooth wave has energy at all harmonics of the fundamental frequency, and the relative amplitude of each harmonic is proportional to the inverse of the harmonic number, e.g., 1/1, 1/2, 1/3, 1/4, etc. The square wave has energy only at the odd harmonics of the fundamental frequency, and the relative amplitude of each harmonic is proportional to the inverse of the harmonic number, e.g., 1/1, 1/3, 1/5, 1/7, etc. The triangle wave has energy only at the odd harmonics of the fundamental frequency, and the relative amplitude of each harmonic is proportional to the inverse of the square of the harmonic number, e.g., 1/1, 1/9, 1/25, 1/49, etc.
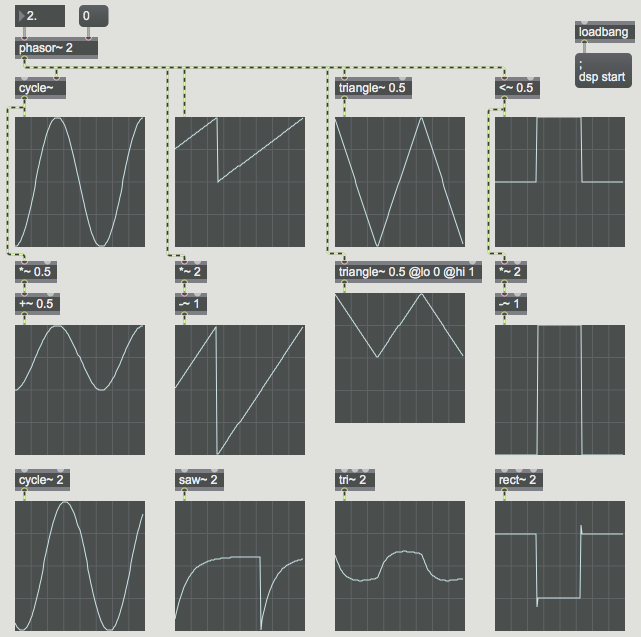
This patch shows how to synthesize those classic waveforms in Max. A very important object for doing this is phasor~. The phasor~ object produces a signal that goes from 0 to (almost!) 1 over and over at a specified rate. (When it gets to a point that would be 1 or more, it wraps back around into the 0-to-0.999999 range.) Thus, with just a little arithmetic, it's very useful for reading through a buffer~ of stored data or for generating other control signal shapes.
In this patch, a single phasor~ is used to a) control the phase offset of a 0 Hz cycle~, which essentially means that it's reading through a stored wavetable containing the shape of one cycle of a cosine wave, b) make an idealized sawtooth waveform (which is what it does all by itself), c) make a triangle wave by going up to, and folding back down from, its maximum at a designated point in each cycle, and d) make an idealized square wave with a simple logic operator that sends out either 1 or 0 based on the specified condition. We're using an inaudible frequency of 2 Hz for the phasor~ so that the waveforms will be displayed well in the scope~ objects.
With just a little more arithmetic (usually just one multiplication and one addition) you can adjust the range of these shapes to be any size you want, as shown in the middle row of graphs. Thus, you could use these shapes to control anything you want, such as frequency in Hertz, for example.
Although these waveforms are fine to use as control signals, they're not always the best choice to actually listen to. That's because the ideal sawtooth, square, and triangle waveforms have a theoretically infinite number of harmonic partials. If we listen to them at fairly high fundamental frequencies, the upper partials are likely to be folded back over due to aliasing, creating an inharmonic spectrum. For that reason, if you actually want to listen to those waveforms, it's better to use the saw~, tri~, and rect~ objects. They use special formulae to calculate a waveform that will have essentially the right spectral content up to the Nyquist frequency, but will not produce significant energy at frequencies that exceed the Nyquist frequency. They don't have the same shape as the ideal forms of those wave types, but they sound the same and aren't subject to aliasing. Use those for listening, and use the idealized waveforms for control signals.
Example 18: The harmonic series in Max
Arpeggiate 16 harmonics of a fundamental
Example from a previous class.
Example 19: Pitch and loudness conversions in Max
Example from a previous class.
Example 20: Frequency glissando vs. pitch glissando in Max
Linear frequency vs. linear pitch
Example from a previous class.
Example 21: Simple demonstration of the transport object in Max
Example from a previous class.
Example 22: Other basic functionality of the transport object
Example from a previous class.
Example 23: The translate object updates its output when the tempo changes
Timing update from the translate object
Example from a previous class.
Example 24: Tempo-relative timing for MSP LFO control
Beat-based timing for glissandi
Example from a previous class.
Example 25: Event timing based on the transport
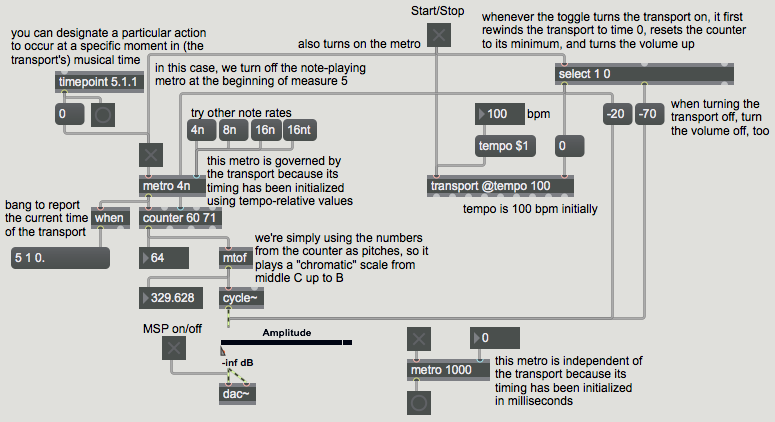
This patch shows a simple use of a transport-governed metronome to trigger events at a constant rate. The metro object that has the argument "4n" will be governed by the transport because its interval is specified in a tempo-relative, music-based "note values" format. (Just for the sake of comparison, the patch includes another metro that is unaffected by the transport because its interval is specified in milliseconds.) The transport-governed metro will only run when the transport is on.
This patch does a very simple musical task. When the metro is turned on (and the transport is running) it will trigger a counter at regular intervals. The interval is a quarter note initially, because of the typed-in argument, but you can change the interval by clicking on one of the message boxes that provides a different rhythmic note value. The actual time in milliseconds will be calculated internally, based on the 'tempo' attribute of the transport. At a tempo of 100 beats per minute, a quarter note equals 600 milliseconds.
The numbers from the counter progress in a loop from 60 to 71. Those numbers are used as if they were MIDI pitch values, middle C up to B, which are converted to the appropriate frequency with the mtof object, and sent to a cycle~ oscillator.
Note that the toggle at the top labeled "Start/Stop" does several things. When it's turned on, it sends out the number 1, which is first detected by the select object. ("If the input is equal to 1, send a 'bang' out the first outlet.") The select object turns the volume of the live.gain~ object to -20 dB (live.gain~ internally interpolates sample-by-sample over a specified ramp time, 10 ms by default, to avoid clicks), resets the transport to time 0 (specified in ticks), and resets the counter to be ready to send out its minimum value. Next, the 1 from the toggle turns on the transport, and turns on the metro.
Example 26: Recurring timed events in HTML5
Test performance of the setInterval() method in HTML5
Most programming languages provide a means of getting a numerical representation of the current time with millisecond or microsecond (or even nanosecond) accuracy, such as the System.nanoTime() method in Java and the cpuclock object in Max. By comparing one instant to another, you can measure time intervals or durations with great accuracy.
In JavaScript in HTML5, the performance.now() method will report the current time with microsecond accuracy. Even without knowing the current time, though, you can schedule events to happen at specific moments in the future in JavaScript with (approximately) millisecond accuracy. The WindowTimers method setTimeout() lets you schedule a named function to be executed a certain number of milliseconds in the future. The format is var theID = setTimeout( theFunction, N ); where N is the number of milliseconds in the future that you want theFunction() to be executed. You can also use a WindowTimers method called setInterval() to schedule a recurring function call every N milliseconds. The methods setTimeout() and setInterval() return a unique ID which can serve as pointer to that scheduled task. It's important to keep track of that pointer, by storing it in a variable, so that you can later clear (unschedule) the task with the method clearTimeout( theID ) or clearInterval( theID ).
This Web page does nothing more than test the accuracy of the setInterval() method. The script uses the performance.now() method to measure how much time elapsed between the time setInterval() was called and the time it reports with each function call. Because performance.now() provides time with microsecond precision, we can see that each setInterval() function call might be off by some fraction of a millisecond. In fact, depending on how busy the client computer is, the timing could be off by more than that. However, this test appears to demonstrate that a) setInterval() seems to compensate for its own lateness on the next function call, so that it doesn't suffer from excessive time lag over the long term, and b) the inaccuracies are generally not so great as to be musically bothersome. The inaccuracies could be problematic in certain time-crucial circumstances, though, and these WindowTimers methods are not sample-accurate for audio processing purposes, nor are they in any way explicitly related to the audio sample-rate timing of the Web Audio API.
Example 27: Scheduling timed notes in HTML5
Schedule notes with setInterval()
Although the WindowTimers.setInterval() method is not explicitly linked to the sample-rate timing of the Web Audio API, in many cases it can be sufficiently accurate for timing of audio events. In this example we use setInterval() to schedule a recurring pattern of notes events in Web Audio API. Try it and see if it is adequately accurate on your computer.
The script creates an array of sixteen pitches and an array of sixteen loudnesses, and uses those arrays to play a recurring pattern of sixteen synthesized notes in a loop, with each note scheduled by setInterval(). Note that the duration of each note is not quite as long as the time interval between note onsets. That produces a very slightly staccato or détaché articulation of the notes, but more importantly it avoids any potentially disparity between the timing of the notes' amplitude envelope and the timing of the setInterval() method.
This script also includes handy functions mtof() for converting MIDI-style pitch numbers to their corresponding frequency, and dbtoa() for converting loudness in decibels into their corresponding linear amplitude.
Example 28: Scheduling audio events in Web Audio API
In the Web Audio API a parameter of an audio node (an AudioParam) can be changed with sample-accurate timing. Each AudioNode object, such as an oscillator node or a gain node, has one or more properties—the frequency value of an oscillator node or the gain value of a gain node—which can be set at specific times, either immediately or in the future.
In this example, we create our own "instrument" object consisting of an oscillator node and a gain node, and then we schedule notes to be played on that instrument at specific times by setting the frequency of the oscillator node and the gain of the gain node. To do that, we create an array of pitches and an array of volumes, and establish a beat tempo. Then we step through the two arrays, scheduling different pitches and volumes to happen at specific times based on the tempo. The program schedules 64 notes at once, then plays them.
Example 29: Arrays and data structures in Max
The table object stores an array of ints that you can then look up by their index number. To store numbers in a table, send the value you want to store in the right inlet, then send the address where you want to store it in the left inlet. To look up the number later, just send the address in the left inlet and table will send out the value stored at that address.
When you double-click on a table it provides a graphic display of the numbers it contains, which can be useful for seeing the shape of the numbers (such as the melodic contour if the array is pitches of a melody). Since it's just a one-dimensional array, you might need two tables if you want to store pitches and loudnesses.
Alternatively, you can use the coll object, which can store more complex messages. It's more like a collection of arbitrary data structures. You provide the index number followed by any message you want to store at that index, and then you can look up that message by its index number. In this example, the coll is used to store two-item lists, consisting of pitch and loudness information for a series of notes.
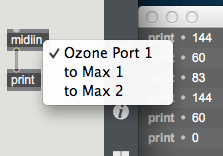
Example 30: Print MIDI bytes in Max
The midiin object captures all incoming MIDI bytes and sends them out one byte at a time. By connecting it to a print object, you can see the exact numbers coming in the MIDI (USB) port.
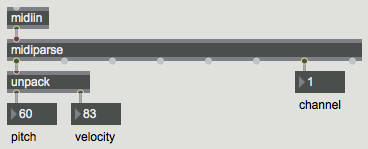
Example 31: Parse MIDI notes in Max
Once you obtain the incoming MIDI bytes with the midiin object, you need to be able to parse that information according to the status bytes. The midiparse object looks at incoming status bytes and sends the vital information out its different outlets.
In this example you can see that all incoming note messages result in a list coming out the left outlet. The list contains the stuff you actually care about: the pitch and velocity data from the note message. The next-to-last outlet sends out the MIDI channel information (derived from the four least significant bits of the status byte).
Example 32: Parse all MIDI messages in Max
Parse all incoming MIDI messages
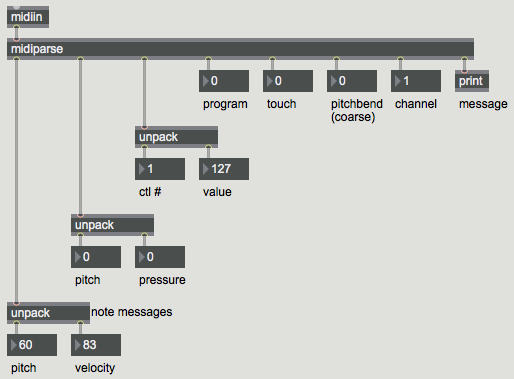
The incoming MIDI bytes obtained with the midiin object can be parsed by the midiparse object. It looks at incoming status bytes and sends the vital information out its different outlets.
In this example you can see that all incoming MIDI messages are parsed by midiparse, and the vital information from each message is sent out the appropriate outlet. In some cases the message contains multiple data bytes of information; in those cases midiparse sends those out as a two-item list. The list contains the stuff you actually care about, such as the pitch and velocity data from a note message. When the message only contains one byte of useful information, the outlet just sends out an int. The next-to-last outlet sends out the MIDI channel information (derived from the four least significant bits of the status byte). The last outlet sends out the entire message, preceded by the word 'midievent', which can be interpreted by other objects you might create.
Example 33: MIDI objects for receiving different MIDI messages in Max
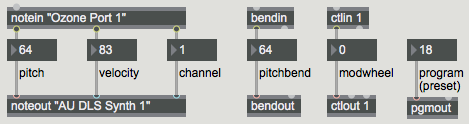
Max has dedicated objects for parsing each particular type of MIDI channel message coming into the computer, such as notes, pitchbends, controllers, etc., and it has corresponding output objects for formatting and transmitting MIDI messages to be sent out of Max. This patch shows a few such objects: the input objects notein, bendin, and ctlin, and their corresponding output objects noteout, bendout, and ctlout, as well as pgmout for transmitting MIDI program change messages.
In this example, incoming notes from the M-Audio Ozone keyboard controller (MIDI input port "Ozone Port 1") are passed out to the operating system of Mac OS X, a virtual MIDI output port called "AU DLS Synth 1". In this way, MIDI messages from a (silent) MIDI control keyboard can be passed to a virtual software synthesizer that interprets the messages correctly and plays the appropriate sound in response.
These MIDI input objects are useful because they identify and parse specific types of incoming MIDI messages, and the output objects are useful because they take the vital information (such as pitch and velocity) and format a correct MIDI message to be transmitted elsewhere.
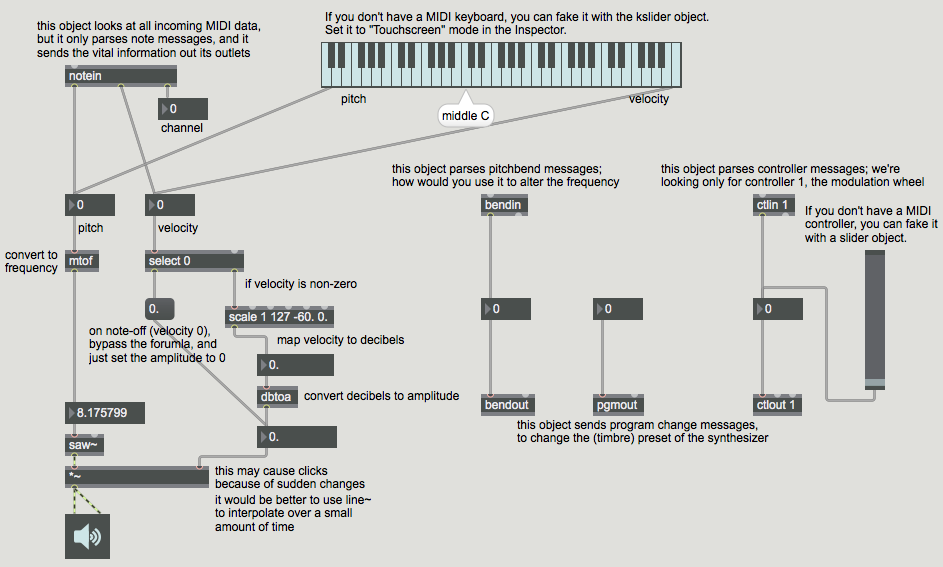
Example 34: A very simple MIDI synthesizer in Max
This is a bare-bones monophonic MIDI synthesizer that uses the pitch and velocity information from incoming MIDI note messages to control the frequency and amplitude of a sawtooth waveform. It works, but it could definitely be improved. Subsequent examples will show how.
This patch uses the MIDI key number (pitch) data byte to set the frequency of a sawtooth oscillator, and it uses the velocity data byte to set the amplitude of the oscillator. Note-on velocity values in the range 1-127 are mapped to a range of decibels from -60 to 0, and those decibel values are then converted to linear amplitude values to scale the amplitude of the oscillator.
Possible improvements to this synthesizer include:
- handling overlapping or simultaneous incoming MIDI note messages by producing polyphonic synthesis (multiple simultaneous tones in response to multiple note messages).
- an ADSR amplitude envelope to control the loudness better
- implementation of MIDI pitchbend messages to alter the frequency commensurately
- vibrato and/or tremolo effect by means of a low-frequency oscillator (LFO), with the modulation wheel controlling the depth of the modulation effect
- portamento to glide from one frequency to another
- envelope to control the timbre of the instrument so that it changes character over the course of the note, probably dependent on the MIDI note velocity
- etc.
Example 35: Voice-stealing for a monophonic synthesizer in Max
Enforcing monophony in a MIDI synth
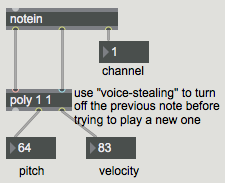
This is the exact same synthesizer as in Example 34, except for the addition of one object.
One not-so-obvious problem with designing a monophonic synthesizer is the fact that people usually don't play a keyboard in an idealized way, ending one note and then starting another. More commonly, people play legato (the Italian word for "tied", meaning connected), in order to get a smoother-sounding transition between notes, by pressing the key of a new note before releasing the key of the previously-played note. Even if the player is not consciously thinking of playing legato, it's very likely that s/he will play the keyboard in that slightly-overlapping manner. That can be a problem when you're making a monophonic synthesizer in MIDI, because the note-off message of the previous note will come after the note-on message of the new note, and could confusingly turn off the new note. That's an inherent problem of the overly simple MIDI synth.
To address that problem, in this example we use the poly object to limit the number of note messages being sent to the synthesizer, so that the synth never gets more than one note message at a time. The poly object keeps track of the number of note-on messages (pitch-velocity pairs) it's holding, and it will turn off the oldest note (the one it has held the longest) when it gets a new note that exceeds its limit. This is the most common way of limiting the number of simultaneous MIDI notes. In our case, we're limiting the number of possible notes to 1, and implementing "voice-stealing" (turning off the previous note before playing the new one) in order to avoid the overlapping note problem described in the previous paragraph.
Example 36: A fixed ADSR envelope in Max
Envelope with the function object
The overly simple MIDI synth shown in an earlier example has no amplitude envelope. It simply turns the sound on and off with instantaneous transitions between zero and nonzero amplitudes. It would be better to smooth those volume changes by interpolation, sample-by-sample, over a certain small period of time.
The line~ object calculates and performs that interpolation, sending out a signal that arrives at a specified destination value in a specified amount of time. Once the signal arrives at that value, it stays there until it receives another message telling it to transition linearly to a new signal value.
It has been noted by synthesizer designers and acoustics researchers that the amplitude envelope (the global shape of the change in amplitude) over the course of a note, as played by many instruments, can be approximated by just a few line segments that describe the short "attack" time as the sound starts rising from silence to peak amplitude, a "decay" time as the sound settles from the attack into a more steady state, the steady-state "sustain" level, and the "release" time as the sound goes silent when the note ends. In synthesizer design, therefore, it has been common to describe the amplitude envelope of a note in terms of those four traits, abbreviated ADSR: attack decay sustain release.
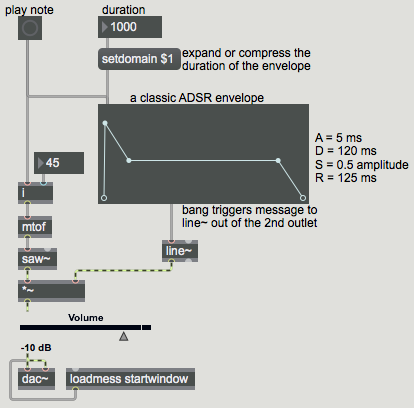
The function object in Max allows you to draw a shape made up of line segments by clicking at the breakpoints conjoining those segments. Therefore, function is very useful for drawing an ADSR envelope. When the object receives the message 'bang', it sends out a message intended for a line~ object that will cause the line~ to send out a signal in the exact shape of the shape shown in the function.
This patch shows how a fixed shape drawn in function might be used to produce an amplitude envelope with line~. The envelope goes from 0 to peak amplitude in 5 milliseconds, then decays to half that amplitude in 120 milliseconds, stays at that amplitude for 750 ms, and drops to 0 in 125 ms. Thus the total duration of the note will be 1 second. The 'setdomain' message to function will keep the shape the same but will change all the transition times proportionally to execute the shape in the specified number of milliseconds.
This works fine for cases where we know the note duration in advance. For use with MIDI in real time, however, the note duration is not known in advance, so it would be better to have an envelope that performs the attack and decay portions, then holds steady until the MIDI note-off message indicates that the note has been released. That will be demonstrated in the next example.
Example 37: ADSR envelope of arbitrary duration in Max
Using a sustain point in a function object
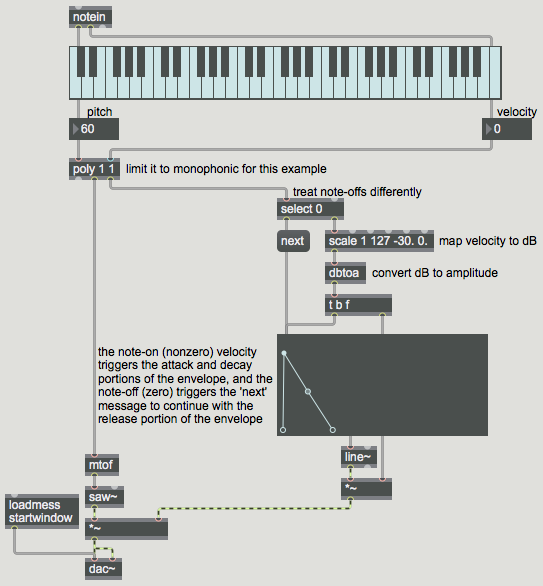
When you play a note with MIDI, you usually want the note to sustain as long as the key is held down, then you want it to turn off (either immediately or gradually) when the key is released (when the note-off message is received). Because MIDI is designed to function in real time, in live performance, there is no duration information contained in a note-on message. The duration can only be known once the key has been released. Therefore, when a MIDI note-on message occurs, a MIDI synth needs to "attack" the note and let it "decay" to its stable "sustain" level, then either stay at that level or slowly diminish (depending on the instrumental effect desired), and finally "release" and turn off completely when the note-off message arrives. So, although we still want an ADSR amplitude envelope, we want the ADS parts to happen on note-on, but we want to delay the R part till the note-off message arrives.
The function object takes that fact into account. You can set any breakpoint in the function (except for the first and last points) to be a "sustain" point where the function will pause. You do that by command-clicking on the point (control-click on Windows) you want to sustain or by sending a 'sustain' message. When function receives a 'bang', it will send out a message to tell the line~ object to make the function shape up to the first sustain point. Then, when function receives a 'next' message it will send a message to line~ to continue the function, up to the end or up to the next sustain point.
In this example patch, the third point of the function (point number 2, since the points are numbered starting at 0) is set to be a sustain point. When the function receives a 'bang' (from a nonzero velocity in a note-on message) it sends out the instructions to line~ to proceed up to that point. Then, when function gets a 'next' message (triggered by the 0 velocity from a note-off message) it completes the envelope.
Note that here we are using the poly 1 1 object to ensure monophonic performance; each new note-on triggers a note-off for the previous note. If that note-off is immediately followed by a note-on, then the release will never have time to occur, and the new attack will happen instead.
Example 38: ADSR envelope subpatch in Max
Use MIDI velocity for amplitude envelope
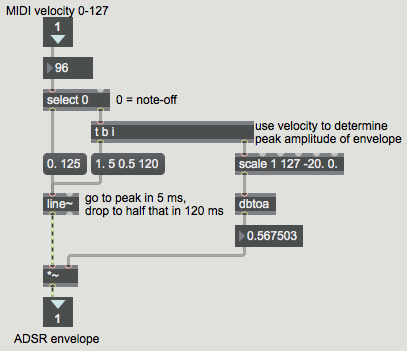
The example titled Using a sustain point in a function object demonstrates an amplitude envelope that stays on its sustain level until a MIDI note-off message is received, then completes its release. The function object is useful for drawing such an envelope and sending the proper messages to a line~ object to make the envelope into a control signal. If you don't need the visual aid, though, you can just as easily do the same thing by constructing the control messages for line~ yourself.
This example shows a patch that can be used as an abstraction (subroutine) to generate an amplitude envelope in response to a nonzero MIDI velocity, and will then provide the release portion of the envelope when it receives a zero velocity. It does pretty much the same thing as the combination of function and line~ in the aforementioned example. You can see this patch in action in the next example.
Example 39: Applying MIDI velocity to ADSR in Max
Test the vtoa ADSR envelope subpatch
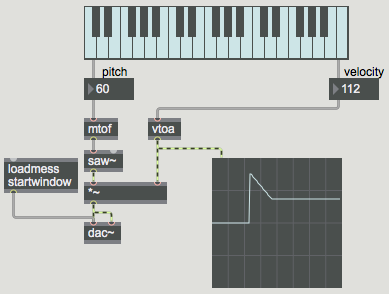
This patch uses the vtoa abstraction shown in Example 38 so that you can see and hear its effect.
Example 40: Detuning oscillators in Max
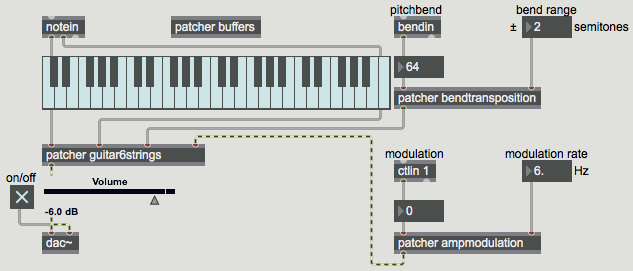
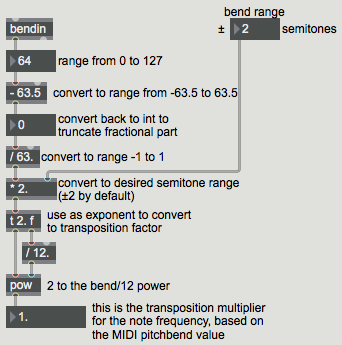
Example 41: Implement MIDI pitchbend in a synthesizer in Max
Calculate pitchbend transposition
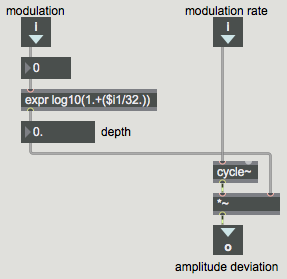
Example 42: Apply mod wheel in a synthesizer in Max
Use mod wheel to control tremolo
Example 43: Managing samples in Max
Sampler subpatch for use in poly~
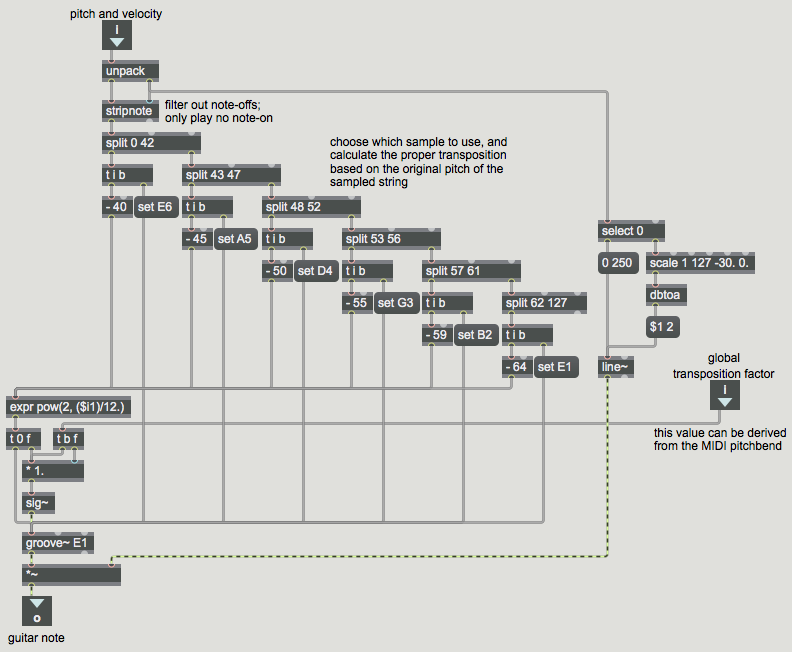
Example 44: Sampling synthesizer in Max
Max examples from previous classes are also available on the Web:
Examples from Music 215B, winter 2016
Examples from Music 152/215, winter 2015
Examples from Music 152/215, spring 2014
Examples from Music 147, spring 2014
Examples from Music 152/215, spring 2013
Examples from Music 215, spring 2012
Examples from Music 152/215, winter 2012
Examples from Music 152/215, winter 2011
Examples from Music 152/215, spring 2010
Examples from Music 152/215, spring 2009
Examples from Music 152/215, spring 2007
Examples from Music 147, winter 2007
Examples from Music 152/215, spring 2006
Examples from COSMOS, summer 2005
Examples from Music 152/215, spring 2005
MSP examples from Music 152, spring 2004
Jitter examples from Music 152, spring 2004
While not specifically intended to teach Max programming, each chapter of Christopher Dobrian's algorithmic composition blog contains a Max program demonstrating the chapter's topic, many of which address fundamental concepts in programming algorithmic music and media composition.
Please note that all the examples from the years prior to 2009 are designed for versions of Max prior to Max 5. Therefore, when opened in Max 5 or 6 they may not appear quite as they were originally designed (and as they are depicted), and they may employ some techniques that seem antiquated or obsolete due to new features introduced in Max 5 or Max 6. However, they should all still work correctly.
This page was last modified May 3, 2016.
Christopher Dobrian, dobrian@uci.edu