This page contains some explanations and example Max patches that are intended to give instruction on the use of Jitter in Max (supplementary to the Jitter Documentation and Jitter Tutorial provided with Jitter), particularly for digital video.
These explanations were written for use by students in the Interactive Arts Programming course at UCI, and are made available on the WWW for all interested Jitter users and instructors. If you use the text or examples provided here, please give due credit to the author, Christopher Dobrian.
[Click on an image for a text version of the actual Max patch.]
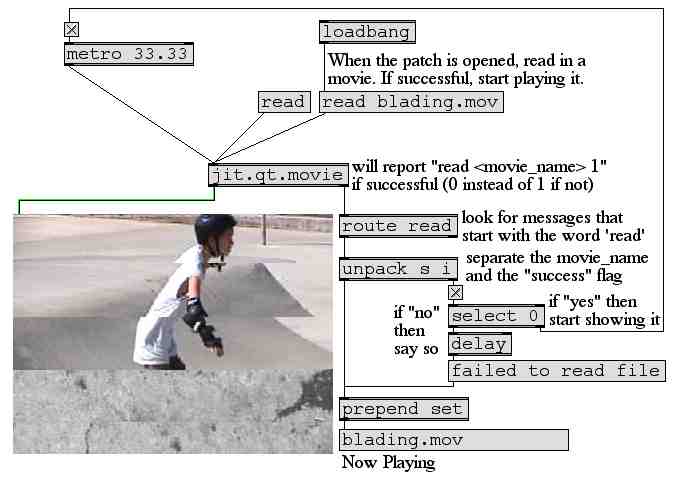
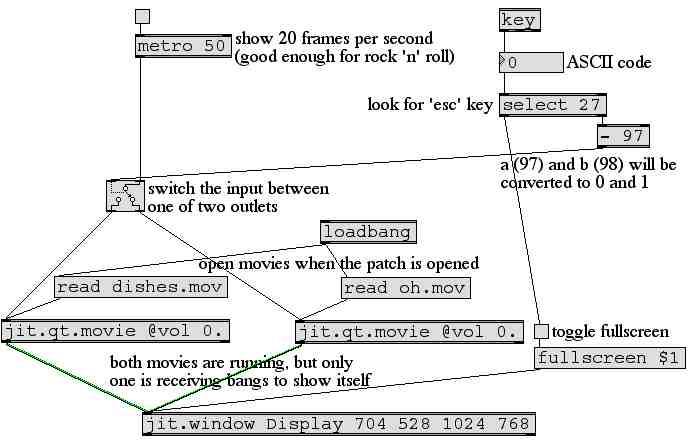
You can automate some of the steps in playing a movie. For example, you can use the loadbang object to set some values or do some tasks automatically when the patch is opened. In this example, we open a movie file as soon as the patch is opened.
When a movie (or other type of media file) is read into jit.qt.movie, the object sends a 'read' message out its right outlet, reporting the name of the file and whether it was read successfully. You can test this success indicator, and if successful, start doing some action (such as start showing the movie).
Jitter objects make extensive use of a new Max capability known as attributes. For an explanation of attributes, you should first read the chapter titled "Attributes" that precedes the Jitter Tutorial in the Jitter Manual (JitterManual.pdf).
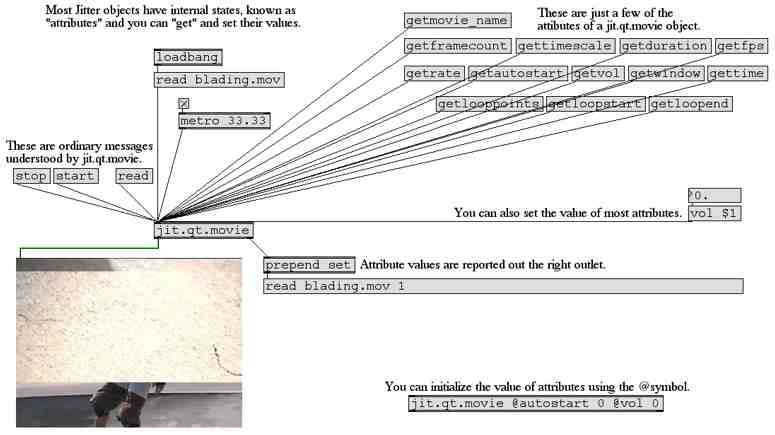
Most Jitter objects are considerably more complex than most other Max objects. Jitter objects commonly have internal values (often very many) that control characteristics (i.e. attributes) of the object and its behavior. You can usually "get" those values to see what they are and/or use them in your Max patch, and you can usually set them to some new value if you want. (Each attribute has an initial default value if you don't set it explicitly.) There are often so many such attributes (i.e., so many internal state variables) per object that it would be impractical for each value to warrant its own inlet and outlet, thus the reason for this new method of accessing them.
For a full list of attributes for each Jitter object, you should consult the Object Reference HTML page for that object. (Use the "JitterReferenceLauncher" command in the Extras menu of Max.) You can also quickly obtain information about what attributes you can get or set, by option-control-clicking on Macintosh or alt-rightclicking on Windows on the object in question; this will give you a pop-up menu of all the messages that that object understands, and in the case of Jitter objects there will often be messages that begin with "get", indicating that those will show you the value of an attribute of the object. If the same word without the "get" is also listed as a message, that means you can set that attribute's value.
In some cases, you can get an attribute's value, check to see what it is, and then based on that value you might decide to do something else such as get other attribute values, set attribute values, etc.
This patch shows how to switch between two movies, using the 'a' and 'b' keys of the computer keyboard. (It also uses the 'esc' key to toggle fullscreen viewing on/off.)
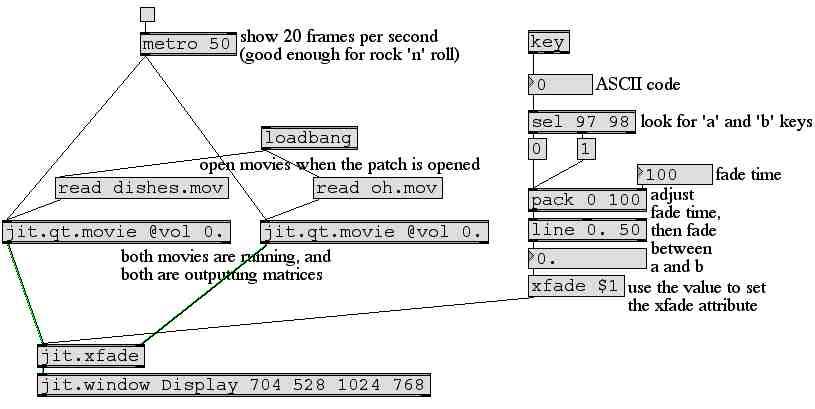
This patch shows how to crossfade between two movies, using the 'a' and 'b' keys of the computer keyboard. You can interpolate between the left matrix (xfade = 0) and the right matrix (xfade = 1) over any period of time.
The jit.brcosa object combines control of three traits of the color levels of an image: "BRightness", "COntrast", and "SAturation". You can control all color planes at once, or each plane individually. (This example only shows modifying all planes at once.)
The jit.op object lets you use any of a large set of possible arithmetic operations to modify an image. (You specify which math operation you want with the 'op' attribute.) You can modify all planes of the incoming matrix with the same arithmetic operation or you can specify a different operation for each plane of the image. You can use a single number as the operand (e.g., multiply all values by 0.5) or you can use an entire matrix as the operand, in which case each pixel of the incoming image is affected by the corresponding location in the operand matrix.
The number matrix in the right inlet is the operand, and the matrix in the left inlet is the matrix that will be sent out after being modified by the operand. In this example, the 'op' attribute is set to "pass + pass pass", which specifies to pass the alpha, green, and blue planes through unchanged, but to add the red plane of the operand matrix to the red plane of the incoming (left) matrix. The result is an image in which the red plane is increased by the brightness of the red value in the operand matrix.

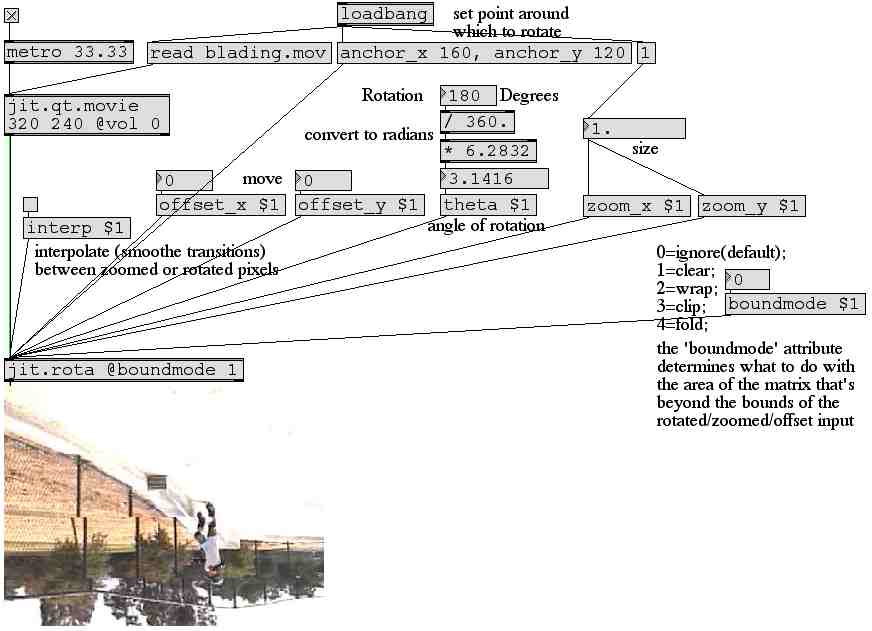
The jit.rota object combines the ability to rotate a matrix (with the 'theta' attribute), resize an image (in the x direction and/or the y direction), or push it from side to side or up and down (offset_x and offset_y). The 'boundmode' attribute specifies what to do with the "background"--the area of the matrix outside the bounds of the rotated/zoomed/offset image.
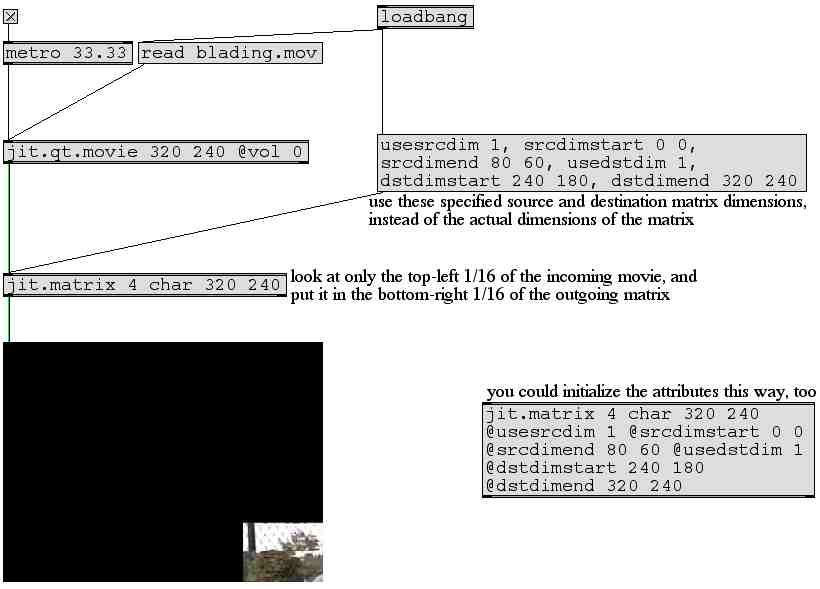
The jit.matrix object is a basic object for loading in an image or for modifying basic characteristics of a matrix. It has several attributes that allow you to look at only a portion of the incoming matrix (known as the "source" region of the matrix) and assign it to a portion of the output matrix (known as the "destination" region of the matrix).
To do this, first you have to tell the object you want it to use the source and/or destination region YOU specify, rather than the full matrix. (You do this by setting the 'usesrcdim' and/or 'usedstdim' attribute to 1.) Then you specify the left-top and right-bottom coordinates (within the matrix) of the region you want to use for the source region and/or the destination region.
This patch uses only the left-top 1/16 of the incoming matrix, and assigns it to be put in the right-bottom 1/16 of the outgoing matrix.
Normally the audio from a movie file goes directly to the digital-analog converter (DAC) of the computer. You can control its volume using the 'vol' attribute of the jit.qt.movie object. ('vol 1' is full volume and 'vol 0' is silence; you can fade the volume in or out by interpolating between 0 and 1 using the line or blineobject.
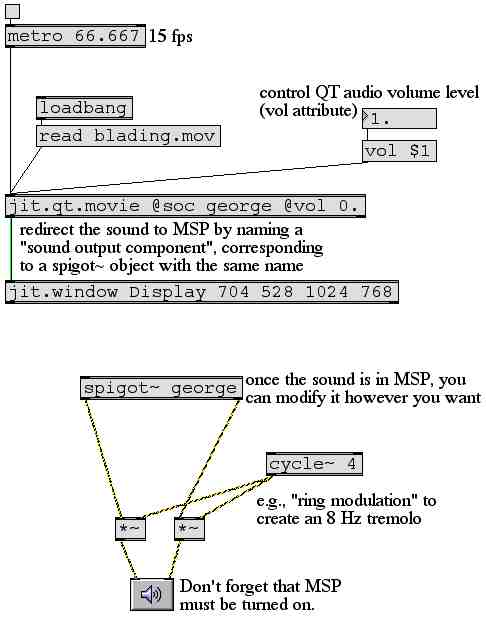
Instead of sending the movie's audio directly to the computer's DAC, you can send it to MSP. To do this, you set the jit.qt.movie object's 'soc' attribute (sound output component) so some name of your choosing, and you then create one (and only one) spigot~ object using that same name as an argument. Then, when you play the movie and turn MSP audio on, the sound will come out of the spigot~ object as a stereo MSP signal instead of going to the computer's speakers. You can then modify the sound in MSP before sending it to the DAC (dac~). The 'vol' attribute of jit.qt.movie still control's the sound's volume before it gets to MSP.
This patch specifies a sound output component named "george". You can control the sound's volume using the 'vol' attribute, and in MSP it is modified by an 8 Hz tremolo effect.
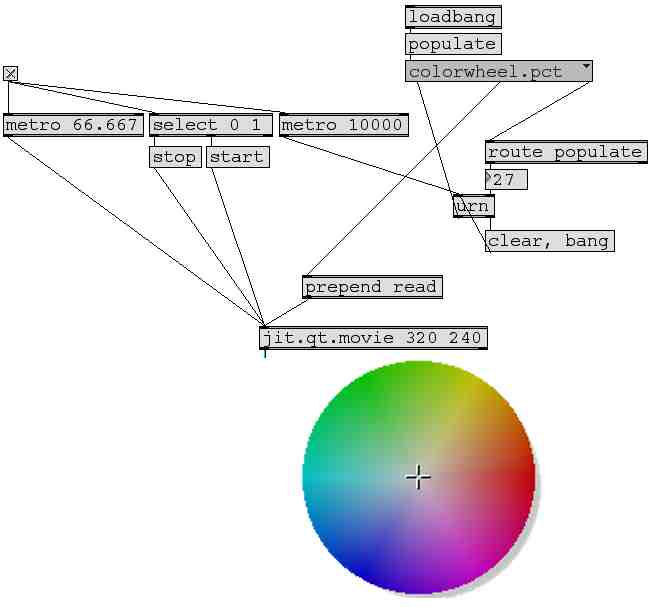
You can read all the files from a particular folder into a ubumenu object, and then use random or urn or any other method of selection to choose a movie from that list. This example patch populates a menu with all the files in the ./patches/media/ folder inside the Max application folder, and then chooses one at random from the list every 10 seconds.
A few things to note in this example: 1) When you populate a ubumenu, the number of items is shown in a 'populate' message sent out the right outlet. You can use that number to limit your choices from the list. 2) You can stop movies when they are not being shown, and start them only when they are being shown; this saves CPU usage and disk access. 3) The urn object sends a bang out its right outlet when it has exhausted its choices. You can use that same bang to clear the urn and then re-bang it to continue.